Archive

Archive for the ‘Uncategorized’ Category

Dell 3100cn Printer with Windows 10

November 20th, 2016 Comments off

While the Dell 3100cn printer is officially not supported under Windows 10 it does work with an alternate driver that ships with Windows 10.

To configure it select the HP Color LaserJet 2500 PS Class Driver during the printer installation.  The colors print well on both the Windows 10 test page and from other programs.

Interestingly some of the generic Microsoft drivers such as the Microsoft PS Class Driver correctly printed the Windows 10 test page in color but appeared as not having color support to other programs.  Also the Dell 3110cn Driver, while very close in model number seems to invert any colors that are printed.

Tags:

Windows Text Console on SmartOS

July 23rd, 2015 Comments off

With SmartOS the vmadm console command offers a convenience method for pulling up a text console for a guest VM.  This is commonly used for Linux and BSD VMs and it can be enabled for Windows VMs too.  The below steps outline how to enable and utilize this feature on Windows 2012 R2 through the use of the Windows Emergency Management Services (EMS).

Configuration

  1. As an administrator user run the following commands. If you have configured more than one boot entry you may want to tailor this command to target only a specific boot entry.  Together these enable EMS and then set it to run on COM1 at a baud rate of 115,200.
    C:\>bcdedit /ems on
    C:\>bcdedit /emssettings EMSPORT:1 EMSBAUDRATE:115200
    
  2. From the SmartOS host start up the console and substitute in the appropriate UUID of the VM from vmadm list:
    # vmadm console <uuid>
    
  3. Reboot the VM.
  4. On the console window you will see something like the following:
    Computer is booting, SAC started and initialized.                               
                                                                                    
    Use the "ch -?" command for information about using channels.                   
    Use the "?" command for general help.                                           
                                                                                    
                                                                                    
    SAC>                                                                            
    EVENT: The CMD command is now available.                                        
    SAC>
    
  5. We’re at a SAC prompt, but it’s not yet the familiar CMD.EXE.  The SAC is the Special Administration Console which has some additional functionality, one of which is to start CMD.  To do so simple run cmd and then switch to the channel that it created:
    SAC>cmd
    The Command Prompt session was successfully launched.
    EVENT:   A new channel has been created.  Use "ch -?" for channel help.
    Channel: Cmd0001
    SAC>ch -si 1
    
  6. From here press any key and then enter in the username, domain, and password when prompted and CMD prompt will then be usable as well as PowerShell by running powershell at the CMD prompt:
    Microsoft Windows [Version 6.3.9600]                                            
    (c) 2013 Microsoft Corporation. All rights reserved.                            
                                                                                    
    C:\Windows\system32>

Limitations

This does not appear to work on all versions of Windows.  When I tried with Windows 7 the bcdedit commands completed successfully but the console text never appeared.  Older versions will need to use the bootcfg command instead of bcdedit.

While functional, the serial console can be a bit sluggish at times.  Also, when using this within xterm the text scrolls at the 25 line mark rather than filling up the full terminal window.

Tags: , ,

Electronic Gates for Wooden Trains

July 4th, 2015 Comments off


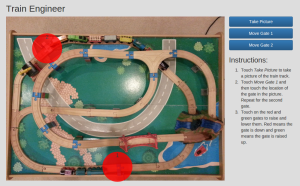
This morning I built the controller and software for the electronic gate system I’ve been working on for my sons’ wooden trains.  This brought interactive control to raising and lowering the gates through a web app.  The result:  it was a hit with my kids and they enjoyed it the rest of the day!

screenshot

Gates

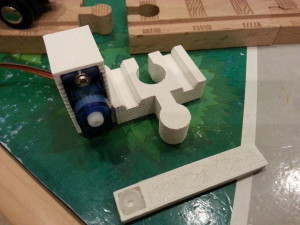
The gates themselves are 3D printed gate housings with an SG90 9g RC servo that supports and opens the gate.  I designed these in OpenSCAD and printed them out on a Da Vinci 1.0 3D printer.  After printing the only assembly required was two screws to hold in the servo and the rest pushed together.  For the gate it is beneficial to leave it as a push-fit so that under abuse from the trains it will simply fall off rather than cause some component to break.

20150703_214603

20150703_215154

Controller Hardware

The parts for the controller are:

  • Raspberry Pi Model B – This is an older model and I’d recommend either the Model B+ or the Raspberry Pi 2 though the instructions will vary a bit from this page.
  • Adafruit Servo Hat – This plugs into the Raspberry Pi and allows for control of up to 16 RC servos.
  • Edimax EW-7811UN USB WiFi adapter – This is a common USB WiFi adapter for the Raspberry Pi.
  • 3 ft. Servo Extension Cables – The servo cables are quite short and these let them reach across the table.
  • 8 GB SD Card – An SD Card a few GB in size.  For a few dollars more you can get one double the size.
  • 2 5V power supplies around 1A.  I used an old phone charger with a Micro-USB connector for the Raspberry Pi and a separate power supply to connect to the Servo Hat.

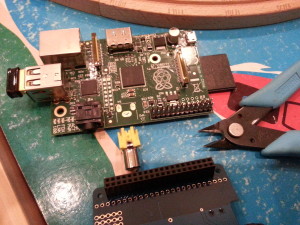
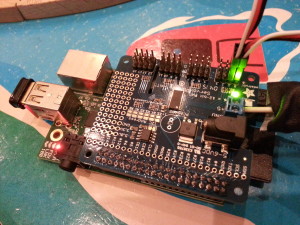
The website for the Servo Hat includes a note:  “can be used with the Model A or B if you use a tall 2×13 header instead of the included 2×20”.  Another approach to getting this to fit on the Model B is to remove the component video output connector from the Raspberry Pi.  I clipped it off and connector (the yellow one) and the Servo Hat fit perfectly onto the board.  I also placed some electrical tape over the solder joints on the bottom side of the Servo Hat to prevent it from shorting out on the HDMI connector and capacitor on the Raspberry Pi board.

20150703_222854

When fully assembled it is about the size of a deck of playing cards:

20150703_214702

Base Install

The high level process for installing and prepping the base system is shown below which assumes some general familiarity with these systems and steps.

  1. Install Arch Linux.
  2. Connect the Raspberry Pi to a wired Ethernet connection.
  3. Run dhcpcd to acquire an IP address.
  4. Install packages for WiFi setup, I2C which is used to interface with the Servo Hat, and Python.
    pacman -Sy dialog wpa_supplicant i2c-tools python2-pip base-devel python2-flask
  5. Run wifi-menu to configure the WiFi.
  6. Edit /etc/wpa_supplicant/wpa_supplicant.conf to configure persistent WiFi security settings.
  7. Set the WiFi to be enabled at bootup.  Use the name provided when running wifi-menu, e.g.
    netctl enable wlan0-mynet
  8. Install the Python I2C libraries:
    pip2 install smbus-cffi
  9. Edit /etc/modules-load.d/raspberrypi.conf and add the two lines to enable I2C support:
    i2c-bcm2708
    i2c-dev
  10. Edit /boot/config.txt and uncomment device_tree_param=i2c_arm=on

At this point SSH should be working over WiFi into the Raspberry Pi.

Software

The control software provides the web front end and also the server-side code to control the servos.

The code is up on GitHub at:

https://github.com/edplese/gatecontroller

Once checked out and copied over to the Raspberry Pi it can be run with the following command which will start the server and listen on port 5000:

python2 main.py

The intent is that this is utilized through a tablet form factor but it works well also on other formats as well.

Closing Thoughts

I had also considered the ESP8266 WiFi module for this project in combination with the more generic Adafruit Servo Driver.  I opted for the Raspberry Pi due to the self-contained nature as the ESP8266 approach would have needed a separate system to run the web application.

Given that the Servo Hat can control 16 servos I am curious what other types of servo-controlled features would work well in this format.

Tags:

Setting up a SmartOS CIFS File Server

June 18th, 2015 Comments off

This is a quick guide for setting up a CIFS/SMB file server using Samba within a virtualized zone on SmartOS.  A couple of the many benefits of doing this on SmartOS are that it can utilize ZFS for file storage and also that the file server can be isolated off as a zone and be run in parallel with various other zones and virtual machines.

On to the setup steps…

  1. From an installed and running SmartOS system setup a JSON config file for the zone.  I tend to create a directory /opt/vmcfg and place the file there, in this case named samba01.json with the following contents.  When placed in a directory under /opt the files will persist across system reboots.  This sample config uses the base-64 15.1.1 image.  The delegate_dataset=true creates a ZFS filesystem that can be managed within the zone which is a nice feature to have on a file server for separating out users or shares to different filesystems.  The alias, hostname, quota, max_physical_memory, ZFS compression, and network configuration can be updated to your environment.
    {
      "brand": "joyent",
      "alias": "samba01",
      "hostname": "samba01",
      "quota": 50,
      "image_uuid": "0edf00aa-0562-11e5-b92f-879647d45790",
      "max_physical_memory": 1024,
      "delegate_dataset": true,
      "zfs_data_compression": "on",
      "zfs_root_compression": "on",
      "dns_domain": "local",
      "resolvers": [
        "8.8.8.8",
        "8.8.4.4"
      ],
      "nics": [
        {
          "nic_tag": "admin",
          "ip": "10.1.1.211",
          "netmask": "255.255.255.0",
          "gateway": "10.1.1.1",
          "primary": true
        }
      ]
    }
    
  2. Create the zone from the configuration file.
    # vmadm create -f samba01.json 
    Successfully created VM 6153d789-5697-4ec6-a237-55198fe3c6b8
    
  3. Log into the zone and install Samba.
    # zlogin 6153d789-5697-4ec6-a237-55198fe3c6b8
    # pkgin update
    # pkgin install samba
    
  4. Setup the ZFS home directories and move the admin user home directory to a ZFS filesystem.
    # zfs create zones/6153d789-5697-4ec6-a237-55198fe3c6b8/data/home
    # zfs create zones/6153d789-5697-4ec6-a237-55198fe3c6b8/data/home/admin
    # cp -a /home/admin/. /zones/6153d789-5697-4ec6-a237-55198fe3c6b8/data/home/admin
    # rm -rf /home/admin
    # zfs set mountpoint=/home zones/6153d789-5697-4ec6-a237-55198fe3c6b8/data/home
    
  5. Create a new user with a separate filesystem for the home directory.
    # zfs create zones/6153d789-5697-4ec6-a237-55198fe3c6b8/data/home/ed
    # chown ed:other /home/ed
    # useradd ed
    
  6. Set the user’s Samba password.
    # smbpasswd -a ed
    
  7. Optionally edit the Samba config file in /opt/local/etc/samba/smb.conf.
  8. Start up Samba.  This will also set it to be enabled at startup.
    # svcadm enable -r smbd
    # svcadm enable -r nmbd
  9. From a Windows or other computer connect to the user’s home directory/share as \\10.1.1.211\ed

This will get you a basic file server setup.  From here you can add addition users, shared directories, etc.

Tags: , ,

Creating an Ubuntu 12.04 LTS VM on SmartOS

April 28th, 2012 Comments off

Joyent’s SmartOS, a fairly recent hypervisor for virtualization, provides a number of prebuilt virtual machine images for various operating systems but doesn’t yet have one available for Ubuntu 12.04 LTS.  This post provides the steps required to install it manually including the basic SmartOS commands as well as some Ubuntu-specific customizations.

  1. Create a JSON file with the virtual machine parameters.  Also see the SmartOS Wiki for some additional options and details.
    {
      "alias": "ubuntu12",
      "hostname": "ubuntu12",
      "brand": "kvm",
      "vcpus": 1,
      "autoboot": false,
      "ram": 4096,
      "resolvers": [ "10.1.1.1" ],
      "disks": [
        {
          "boot": true,
          "model": "virtio",
          "size": 40960
        }
      ],
      "nics": [
        {
          "nic_tag": "admin",
          "model": "virtio",
          "ip": "10.1.1.11",
          "netmask": "255.255.255.0",
          "gateway": "10.1.1.1",
          "primary": true
        }
      ]
    }
  2. Create the virtual machine with the vmadm command using the JSON file as the input.
    # vmadm create -f ubuntu-12.04.json
    Successfully created 3b202a79-f148-4c87-bb7f-ff9d64f724ca
  3. Copy the Ubuntu 12.04 LTS install ISO to the root dataset for this virtual machine. This assumes the ISO has already been copied to the /zones/isos directory on the SmartOS server.
    # cp /zones/isos/ubuntu-12.04-server-amd64.iso \
         /zones/3b202a79-f148-4c87-bb7f-ff9d64f724ca/root/.
  4. Boot the VM to the ISO.
    # vmadm start 3b202a79-f148-4c87-bb7f-ff9d64f724ca \
                  order=cd,once=d cdrom=/ubuntu-12.04-server-amd64.iso,ide
    Successfully started 3b202a79-f148-4c87-bb7f-ff9d64f724ca
  5. Get the VNC IP and port from the VM.
    # vmadm info 3b202a79-f148-4c87-bb7f-ff9d64f724ca vnc
    {
      "vnc": {
        "host": "10.1.1.4",
        "port": 63407,
        "display": 57507
      }
    }
  6. Connect to the VM with VNC and complete the installation as normal, including the reboot at the end.
  7. Enable the serial console in Ubuntu with the steps from the Ubuntu SerialConsoleHowto.  This step is optional but adds some nice administration benefits as demonstrated in the next step.
    1. Paste the following into /etc/init/ttyS0.conf.
      # ttyS0 - getty
      #
      # This service maintains a getty on ttyS0 from the point the system is
      # started until it is shut down again.
      
      start on stopped rc or RUNLEVEL=[2345]
      stop on runlevel [!2345]
      
      respawn
      exec /sbin/getty -L 115200 ttyS0 vt102
    2. Ask upstart to start the getty.
      $ sudo start ttyS0
  8. The serial console can then be connected to from the SmartOS host with the vmadm tool. Exiting from this console is done with CTRL-].
    # vmadm console 3b202a79-f148-4c87-bb7f-ff9d64f724ca
    Unknown command: console
    
    Ubuntu 12.04 LTS ubuntu12 ttyS0
    
    ubuntu12 login: ed
    Password:
    Last login: Sat Apr 28 22:38:41 CDT 2012 from 10.1.1.4 on pts/0
    Welcome to Ubuntu 12.04 LTS (GNU/Linux 3.2.0-23-generic x86_64)
    
     * Documentation:  https://help.ubuntu.com/
    
      System information as of Sat Apr 28 22:39:26 CDT 2012
    
      System load:  0.0               Processes:           61
      Usage of /:   4.1% of 35.92GB   Users logged in:     1
      Memory usage: 1%                IP address for eth0: 10.1.1.11
      Swap usage:   0%
    
      Graph this data and manage this system at https://landscape.canonical.com/
    
    9 packages can be updated.
    0 updates are security updates.
    
    ed@ubuntu12:~$
Tags: , ,

Quick Change Tool Post Bolt

June 21st, 2011 Comments off

When I purchased my Grizzly G0602 10×22 metal lathe one of the first projects I had in mind was to mount an AXA-size quick change tool post on it.  Most of the methods I found online for doing this required either modifying the tool post mounting plate that came with the lathe or creating a suitable replacement with a threaded hole to fit with the quick change tool post bolt.  I didn’t want to modify the mounting plate and creating one from scratch would have been a challenge without a mill so instead opted to create a new tool post bolt.

To do this I started with a 1/2″ x 3.5″ bolt, turned down the end, and then threaded it with metric threads to fit the mounting plate.  In the end it turned out to be a quick and simple that has worked very well.

Tags: ,

Auditorium Lightning Effect

April 15th, 2011 Comments off

A few years back I was working on a production of Shadowlands for a high school and one of the scenes had thunder and lightning.  We were going to use some simple lighting for the lightning but I had some alternative ideas and spent some time experimenting with them.  The end result was a nice lightning effect that we used for the shows.

I initially started looking at strobe lights to create this effect due to their quick recharge time but quickly turned elsewhere.  There were a number of inexpensive units available but they were all geared towards DJ lighting and could only flash at a fixed frequency.  Not being too familiar with strobe lights like these I wasn’t sure how easy they would be to modify to accept an external trigger.

Next on the list were external camera flashes which can be externally triggered through the hot shoe mount.  The main downside was a 15 second recharge time on the flashes so multiple flash units were needed to have multiple flashes in quick succession.  There was a nice assortment of inexpensive camera flashes available, but to cut the bill to zero I was able to borrow 3 nice Sigma flashes from the journalism department of the school.  I wasn’t able to make any modifications to the borrowed flashes and without any hot shoes for them it was difficult to connect to the hot shoe contacts.

Like most external camera flashes, the Sigma flashes were able to be set in slave mode where they fire when another flash is detected.  I wasn’t sure at first how this worked but the transparent red cover over the sensor was a pretty strong hint that it was detecting the infrared light of the other flash.  Testing this was simple enough by just pointing any IR remote control at it and pressing a button and the flash would fire.

Auditorium Lightning Flashes

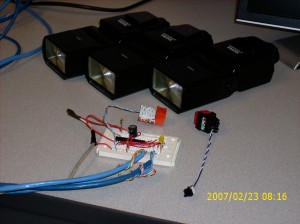
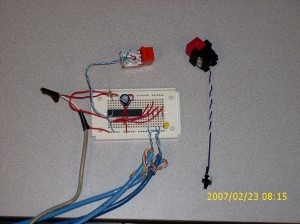
With the flashes and triggering method in place it was on to a control mechanism to trigger them.  I had plenty of AVR microcontrollers on hand and assembled a simple control circuit on a breadboard.  The main components were an ATMEGA168, pushbutton, and 4 LEDs.  For testing I initially started out with regular LEDs and once working these were swapped out with IR LEDs for triggering the flashes.

Auditorium Lightning Controller

The code for the AVR was very simple:  wait for the button to be pressed, pulse the LEDs in one of the predefined and timed pattern, repeat.  I ended up only using two flash patterns but the code is easily expanded to include additional ones.  DMX is the typical lighting control protocol but given the constraints for this project the simple pushbutton was used instead.  The full code that was used is shown below.

The flashes were mounted in the auditorium catwalks with two on the left and one on the right.  The IR LEDs were attached to the flashes with gaff tape and then connected to the breadboard with CAT5 cable.

In the end this was a successful project and worked well through all three performances.

#include <util/delay_basic.h>
#include <avr/io.h>

#define FLASH_MS 25
#define FLASH_RECHARGE_MS 15000

void delay_ms(uint16_t ms) {
  uint16_t a = 0;

  while (a < ms) {
    uint16_t d = ms - a;
    if (d > 200) {
      d = 200;
    }

    _delay_loop_2(d << 8);
    a += d;
  }
}

void adj_delay_ms(unsigned short ms) {
  delay_ms(ms - FLASH_MS);
}

void trigger_flash(unsigned char n) {
  PORTD |= _BV(n);
  delay_ms(FLASH_MS);
  PORTD &= ~_BV(n);
}

int main (void) {
  DDRD = 0xff; /* all outputs */
  PORTD = 0x00;

  char program = 0;

  while (1) {
    // wait for flashes to charge
    delay_ms(FLASH_RECHARGE_MS);

    // turn on "ready" LED
    PORTD |= _BV(PD3);

    while (PINC & _BV(PC4)) {
      // wait for button press
    }

    // turn off "ready" LED
    PORTD &= ~_BV(PD3);

    switch (program) {
    case 0:
      trigger_flash(0);
      adj_delay_ms(100);

      trigger_flash(1);
      adj_delay_ms(500);

      trigger_flash(2);
      break;
    case 1:
      trigger_flash(2);
      adj_delay_ms(400);

      trigger_flash(0);
      adj_delay_ms(140);

      trigger_flash(1);
      break;
    }

    program += 1;
    if (program > 1) {
      program = 0;     
    }          
  }     

  return (0);
}
Tags: ,

VMware ESXi 4.1 on Intel D510MO

April 10th, 2011 2 comments

I set up VMware ESXi 4.1 Update 1 on an Intel Desktop Board D510MO earlier this week and hit a few snags along the way.  This hardware is nowhere close to appearing in the VMware Compatibility Guide but some searching showed that a number of people had gotten it working.

My end goal was a diskless setup with ESXi booting from a USB flash drive with networked storage for the virtual machines.  The newest versions of ESXi allow installation to USB drives from the normal installer so I started off by booting to the install CD.  Even before I was prompted for any input I hit the following error:

vmkctl.HostCtlException Unable to load module /usr/lib/vmware/vkmod/vmfs3: Failure

Some searching turned up a number of responses to the effect of “use supported hardware” but for my purposes that’s not really what I had in mind.  Because others were successful with this board I suspected this was only an issue during the install but that it should work correctly once installed.

I next attempted an install from a virtual machine running in VirtualBox on a different machine.  I created the VM with a type of “Linux” and a subtype of “Linux 2.6 (64-bit)”.  After getting this setup I was able to successfully boot the installer and install ESXi to the USB flash drive.  I then moved the flash drive back to the D510 board and it booted successfully.

Once booted though I saw the second hurdle:  no NICs were found.  This board has a RealTek NIC that’s unsupported by ESXi.  I found that some users had created a driver package for ESXi that included the driver needed for the RealTek.  The older versions of this driver had numerous reports of network dropouts under load but the newer version 8.018 seems to work well.  I copied this file over the top of the oem.tgz file that was on the USB flash drive.

Once installed and with the proper NIC driver in place I finally had a working ESXi install on the D510 board.

Tags: , ,

Update $DISPLAY in Screen

December 12th, 2009 Comments off

I’ve been a heavy user of GNU Screen for a number of years.  My typical usage is to start a single screen session and attach to it as I move to different computers, either locally or via SSH.  At times I have a need to run X applications from a shell within screen, but with $DISPLAY set to the value screen was initially run with, this tends to not work after it is detached and attached to from a different location.

A few days ago, I came across allsh, a program that allows commands to be executed in all currently running shells.

I was curious if a similar method might work to fix my $DISPLAY issue.  Ideally, I wanted to be able to attach to the screen session from any location and have $DISPLAY updated in all of the bash subprocesses of screen to properly reflect the desired display.

The following is what I came up with to achieve this.

In ~/.profile:

TRAPUSR2() {
 [ -f ~/.screen-display ] && . ~/.screen-display
}

trap TRAPUSR2 USR2

# set the $DISPLAY variables if the shell is a child of screen
if [ "`ps -p $PPID -o comm | tail -1`" == "screen" ] ; then
 [ -f ~/.screen-display ] && . ~/.screen-display
fi

And in a file named attach, placed somewhere in your $PATH:

#!/bin/bash

echo "DISPLAY=\"$DISPLAY\"" > ~/.screen-display
echo "SSH_CLIENT=\"$SSH_CLIENT\"" >> ~/.screen-display
echo "SSH_CONNECTION=\"$SSH_CONNECTION\"" >> ~/.screen-display
echo "SSH_TTY=\"$SSH_TTY\"" >> ~/.screen-display
echo "XAUTHORITY=\"$XAUTHORITY\"" >> ~/.screen-display

# detect the pid of screen, but should be smarter if more than one
# instance is running
if [ `screen -ls | awk -F. '/tached/ { print $1 }' | wc -l` != "1" ] ; then
 echo "Unable to detect the desired screen session."
 exit 1
fi
SCREEN_PID=`screen -ls | awk '/tached/ { split($1, a, "."); print a[1] }'`

# find the pids of the shells that are children of screen
BASH_PIDS=`ps -e -o pid,ppid,comm | \
 awk '$2 == var1, $3 ~ /bash/ { print $1 }' var1=$SCREEN_PID`
kill -USR2 $BASH_PIDS

exec screen -d -r

With this setup, start screen as normal, and then to attach to it from another location, run attach.

Tags: , ,

Samba shadow_copy2 Enhancements

December 2nd, 2009 Comments off

A few weeks ago there was a thread on the Samba mailing list regarding some difficulties in getting my shadow copy patches to work with newer versions of Samba.  These patches were originally written for Samba 3.0.25, and since then, Samba has moved up to version 3.4.3, with the 3.5.0 release on the horizon.  The more recent Samba versions also include a shadow_copy2 module that will likely be replacing the shadow_copy module in the future.

I spent some time today adapting the original patches to the shadow_copy2 module.  This patch was made against Samba 3.4.3, and I will be working on a version for Samba 3.5.x over the next couple days.  I hope to get this integrated into Samba, but for now, it’s available below:

Creating a patched Samba source tree can be done with:

$ gzcat samba-3.4.3.tar.gz | tar -xf -
$ cd samba-3.4.3
$ gzcat ../samba-3.4.3-shadowcopy.patch.gz | patch -p1

The parameters added with this patch, as shown at the top of the source file, are:

shadow:sort = asc/desc, or blank for unsorted (default)

This is an optional parameter that specifies that the shadow
copy directories should be sorted before sending them to the
client.  This is beneficial for filesystems that don't read
directories alphabetically (e.g. ZFS).  If enabled, you typically
want to specify descending order.

shadow:format = <format specification for snapshot names>

This is an optional parameter that specifies the format
specification for the naming of snapshots.  The format must
be compatible with the conversion specifications recognized
by str[fp]time.  The default value is "@GMT-%Y.%m.%d-%H.%M.%S".

shadow:localtime = yes/no (default is no)

This is an optional parameter that indicates whether the
snapshot names are in UTC/GMT or the local time.

Example usage with ZFS for the [homes] share is:

[homes]
   comment = Home Directories
   browseable = no
   writable = yes
   vfs objects = shadow_copy2
   shadow: snapdir = .zfs/snapshot
   shadow: sort = desc
   shadow: localtime = yes
   shadow: format = %Y%m%d-%H%M%S

Where the snapshots would be taken with:

# zfs snapshot -r tank/home@`date +%Y%m%d-%H%M%S`

Recent versions of OpenSolaris allow ZFS snapshots to be created remotely over SMB/CIFS by simply creating a directory in the .zfs/snapshot subdirectory.  To see how this can be used, see my Windows Backups to ZFS post.  Though referring to the SMB/CIFS server built into OpenSolaris, the concept works equally as well with Samba and the shadow copy patch.
Tags: ,